
👨💻 about me home CV/Resume News 🖊️ Contact Github LinkedIn I’m a Haskeller 🏆 Best of LuaX pub bang ypp panda lsvg Fizzbuzz Calculadoira TPG todo pwd rrpi
I don't like GAFAM's way of eating my personal data. So I decided to self-host my personal cloud to protect my privacy and have full powers on my data instead of Google.
This page describes a basic Raspberry Pi installation:
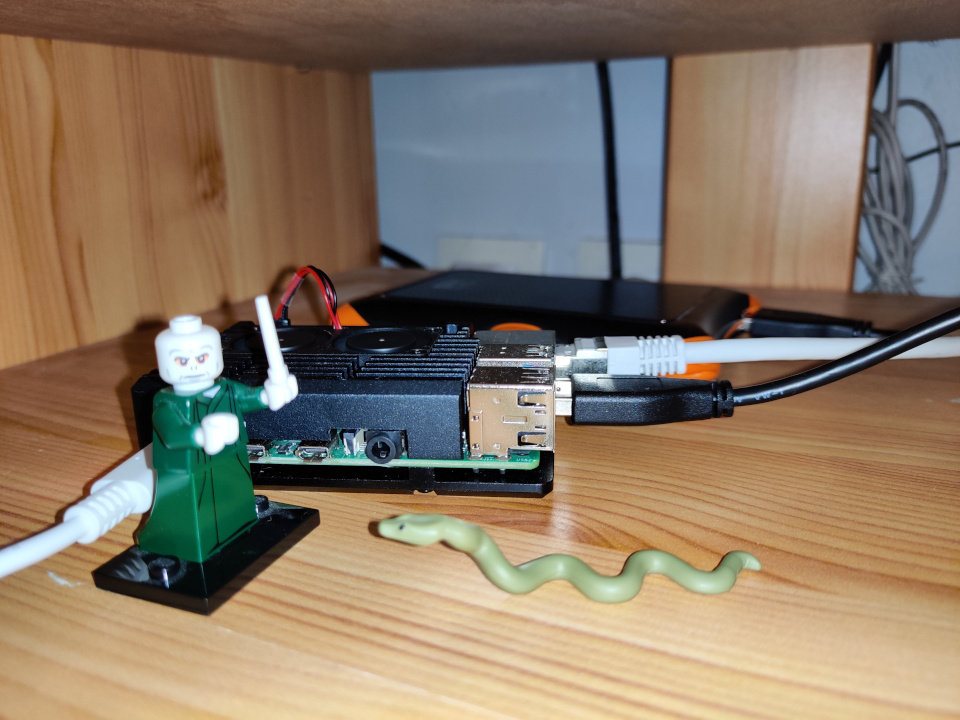
All being run on a small pretty Raspberry Pi ;-)
The server will run 24/7 so running on a regular desktop PC is no good idea. We are going to install it on a Rapsberry Pi connected to the local network.
For this you will need:
My own data center is also equipped with a nice aluminium open case with two fans:
Just plug everything and let's continue with the software setup.
The software setup is completely made from a Linux PC connected to the same local network than the Raspberry Pi (Ethernet or WiFi).
The whole installation is scripted. My script is available here: rrpi.
rrpi connects to the Raspberry Pi with ssh. The
Raspberry Pi hostname shall be given on the command line. The default
host name is raspberrypi.local. The script shows a menu for
a step-by-step installation.
WARNING: This script is provided for free and with no guaranty. Please read it before using it. It may fail and you may have to fix issues that are not described here.
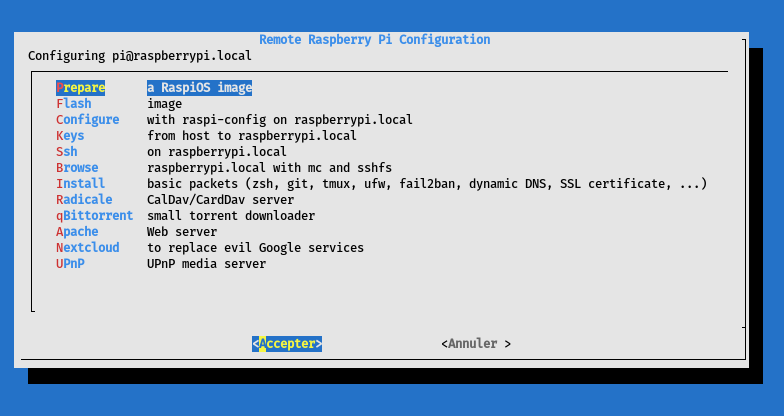
rrpi and select Prepare.~/raspios).rrpi and select Flash.rrpi should auto-detect
it).We will start by configuring the Raspberry Pi with
raspi-config.
rrpi and select Configurepi user
password and choose a strong password. b. System Options / Hostname:
choose a different hostname (this hostname will be a parameter of
rrpi in the next steps, e.g. mypi). c.
Interface Options / SSH: Enable SSH. d. Localisation Options / Locale.
e. Localisation Options / Timezone. f. Advanced Options / Network
Interface Names: Enable predictable network i/f names.To connect with SSH keys instead of password, you need to push your keys to the Raspberry Pi.
ssh-keygen to create your SSH keys if you don't
have one.rrpi and select Keys to push your
public key to the Raspberry Pi.Ssh to try your SSH configuration. You should
now be connected to the Raspberry Pi.sudo reboot to reboot with the new configuration
(hostname, ...).From now on you shall start rrpi with the right hostname
(e.g. rrpi mypi.local).
The following steps use a configuration files that must be created on the Linux PC used to configure the Raspberry Pi:
~/.myconfThis file is a Lua script that shall be executable and define the following parameters:
-------------------------------------------------------------------------------
-- GANDI API
-------------------------------------------------------------------------------

gandi = {
    api_key = "Your Gandi API key here",
    domain = "your domaine name",
    subdomain = "subdomain pointing to the Raspberry Pi (e.g. mypi)",
    ipversion = 4 or 6,
}

-------------------------------------------------------------------------------
-- Network monitor
-------------------------------------------------------------------------------

netmon = {
    router = "local IP of the local router (may be your ISP modem or a local router)",
    box    = "local IP of your ISP modem",
    web    = {
        "first Internet server to ping",
        "second Internet server to ping",
        "third Internet server to ping",
    },
}

-------------------------------------------------------------------------------
-- AbuseIPDB
-------------------------------------------------------------------------------

abuseipdb = {
    api_key = {
        ssh = "Key used to report SSH attacks",
        web = "Key used to report Apache attacks",
    }
}gdns)If the server shall be accessed from Internet, it shall have a fixed
IP or a domain named. rrpi can configure a DNS entry on a
Gandi DNS record. You will need to buy a
domain name at Gandi (or adapt the script for your own needs) and create
a configuration table with Gandi API key (~/.myconf).
The script bin/gdns will be created on the Raspberry Pi.
It regularly checks the external IP and updates the Gandi DNS record
when the external IP changes.
netmon)rrpi creates two scripts used to monitor the Internet
connectivity and the Raspberry Pi:
~/bin/status: updates
/var/www/html/status.html (some statistics about the
Raspberry Pi).~/bin/netmon: updates
/var/www/html/netmon.html (regularly pings some servers to
check Internet is reachable). To reset this file, please delete
/var/www/html/netmon.csv.netmon is configured by ~/..myconf.
My ISP modem is very bad and regularly looses Internet connection. A
simple workaround is to reboot the modem every night at 4 AM.
netmon ignores errors around 4 AM. This behaviour can be
changed in rrpi.
Fail2ban is used to ban IPs that
try to hack the Raspberry Pi. Its configuration is hard-coded in
rrpi. Banned IPs are reported to AbuseIPDB. AbuseIPDB keys shall be
defined in ~/.myconf.
hey is used to install some LuaX based softwares.
This will install some CDSoft programs precompiled for Raspberry Pi:
and also some great tools:
Run rrpi mypi.local and select
Install.
This will install some Debian packages:
and configure:
The Apache web server can be used to host an HTTP server on the Raspberry Pi. It is also required if you plan to install Nextcloud.
rrpi mypi.local and select
Apache.Ssh to connect to the Raspberry Pi.sudo certbot --apache to configure and install SSL
certificates.Radicale is a small but powerful CalDAV (calendars, to-do lists) and CardDAV (contacts) server. You can install Radicale if you don't need Nextcloud.
rrpi mypi.local and select
Radicale.Nextcloud is a complete alternative to Google (calendars, contacts, drive, ...) and Dropbox (file synchronization). It works pretty well and integrates perfectly with Thunderbird, Android, ... I have a 500 Gb cloud for just the price of a 500 Gb SSD and my data remain mine.
rrpi mypi.local and select
Nextcloud./var/www/html/nextcloud/config/config.php (see
rrpi output).http:mypi.local/nextcloud to configure the
Nextcloud server.The Debian packet minidlna can be used to store and
shared media files (music, video, ...). Shared files will be stored in
/home/pi/dlna.
rrpi mypi.local and select UPnP.rrpi mypi.local and select
qBittorrent.qbittorrent-nox on the Raspberry Pi to start the
qBittorrent server (Ctrl-C to stop it).This script is constantly updated and the documentation may be outdated. The best is always to read the sources and change them to fit your requirements.
GitHub and GitLab are great but if you need private repositories, you may want better privacy and control over your data.
And Git can be installed locally on a Raspberry Pi.
The procedure described here is a summary of Build your own Raspberry Pi Git Server.
Connect to the Raspberry Pi
ssh pi@piEnsure git is installed
sudo apt update
sudo apt upgrade
sudo apt install git
Create a directory
mkdir -p /home/pi/git/hello
cd /home/pi/git/hello
Initialize the Git repository
git init --bareCreate the repository
git init
git remote add hello pi@git.example.com:/home/pi/git/hello
Push the first commit
git add .
git commit -m "Initial commit"
git push hello master
Clone the repository on another PC
git clone pi@git.example.com:/home/pi/git/hello